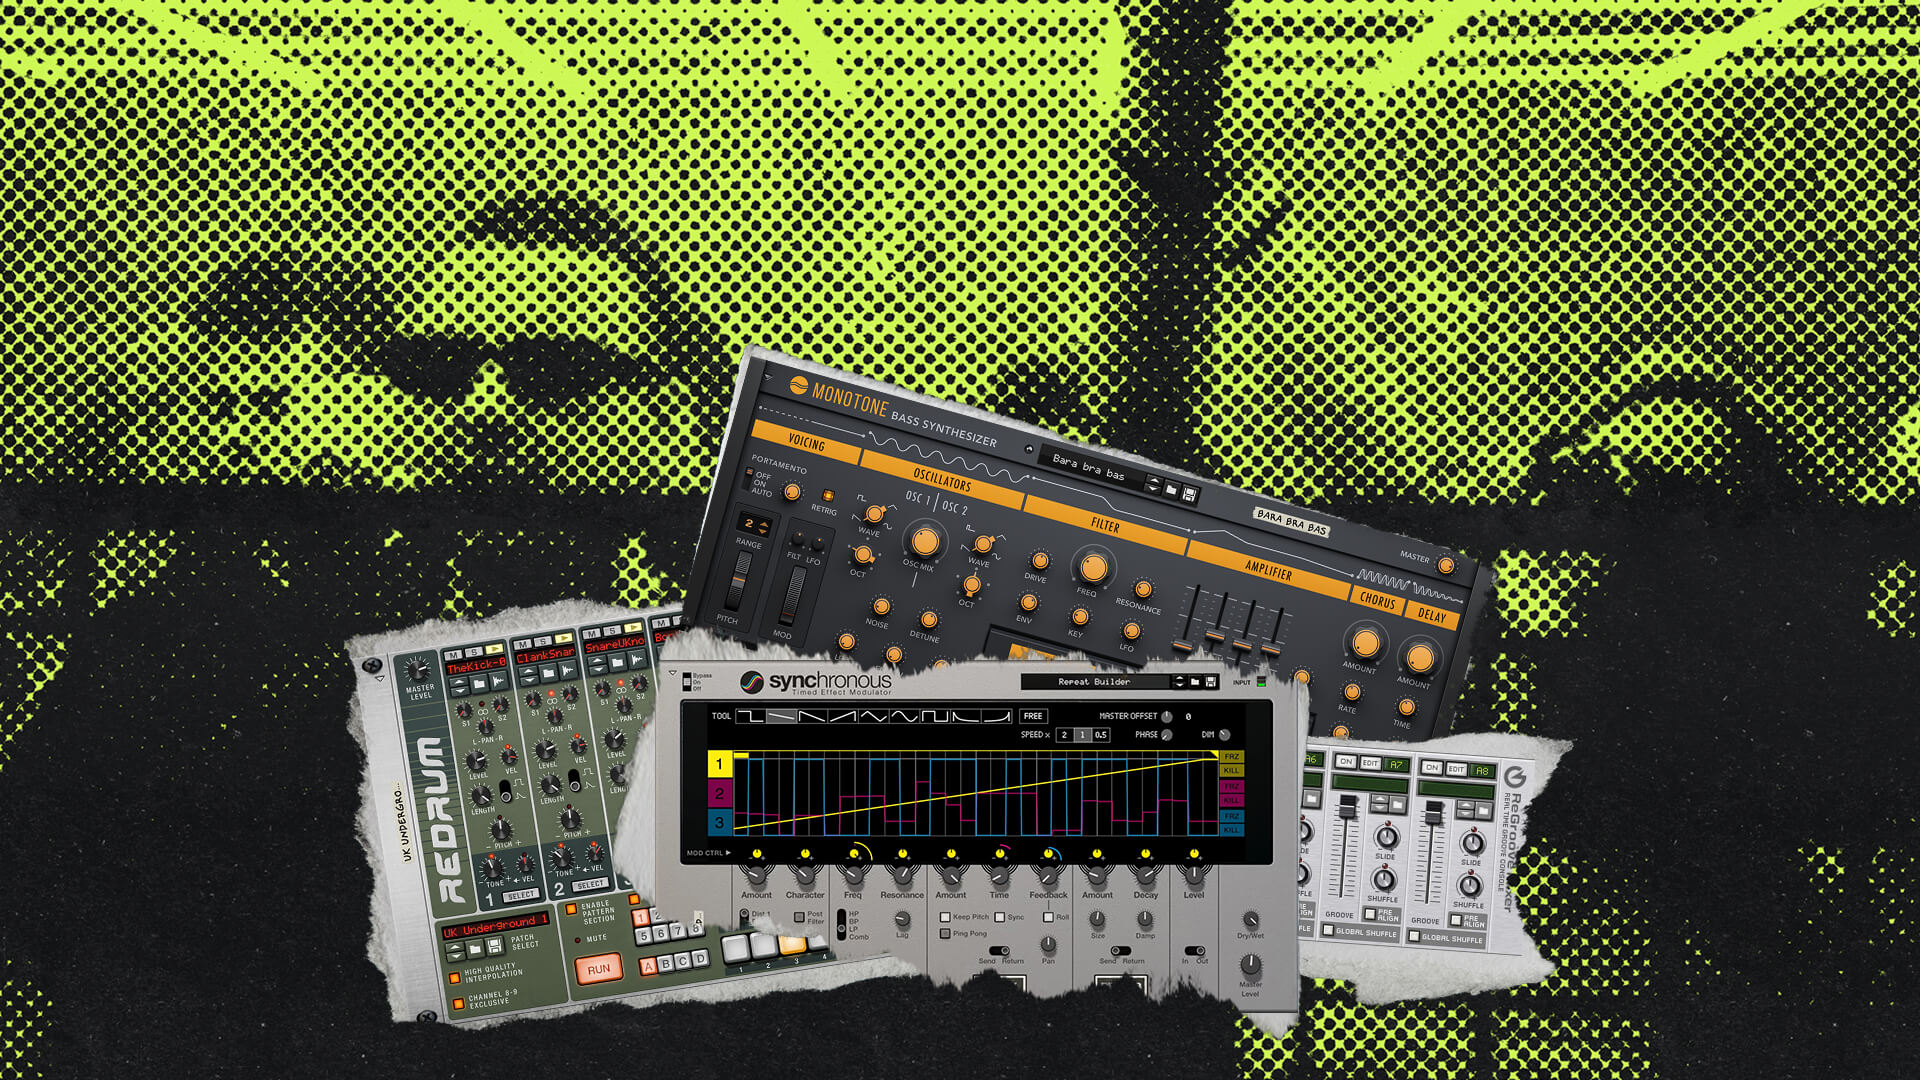
“Groove techno”, often referred to simply as “groove”, is a fast, percussion-driven sound quickly gaining attention on social platforms like TikTok and in modern underground club culture. In this article, we will explore the roots of this emerging style’s heavily swung rhythms, muscular bass, and minimal melody, and show you how to build the sound yourself in Reason.
Why now?
When clubs worldwide finally reopened after the pandemic, the electronic underground embraced harder, faster, more aggressive sounds for a period, perhaps reflecting the pent-up energy of dancers. But as that relentless hard techno sound eventually grew to dominate festival mainstages, fatigue began to set in.
In response, the underground has been shifting focus back toward funk and rhythmic interplay. The BPMs have remained high, but emphasis is now on swung, rolling rhythms rather than sheer destruction. But how much of this is really a new direction, and how much is a new younger generation discovering techno’s past?
While the name might feel new to some, the foundations go back decades. In the late ‘90s and early 2000s, legendary UK DJ and producer Ben Sims was the most instrumental figure in pioneering the hardgroove sound. Through his seminal label Hardgroove Records, Sims fused driving techno with funk, layered hip-hop-inspired sampling, and swung syncopation inspired by Detroit pioneers like Jeff Mills.
Modern groove techno sidesteps the long-standing “What is hardgroove?” naming debate by slightly shifting focus for a new generation. This is a sound highly indebted to the past, while feeling moodier, faster, and sleeker for today’s dancefloors.
What does groove techno sound like?
Artists shaping the sound include Yanamaste, Funk Assault (Chlär and Alarico), and Bailey Ibbs. For a starting point, listen to the track below and pay attention to how bass and percussion work together.
For a deeper listen, Berlin label OBSCUUR’s GROOVE TECHNO playlist provides hours of expertly curated tracks which can serve as a masterclass in modern rolling groove, syncopation, and low-end balance.
Step 1: Build the drum foundation
We’ll start with a four-bar pattern using Redrum at 144BPM. A steady kick and continuous shaker establish the pulse, while the additional percussion creates movement around them.
We’ll program the notes in Reason’s main sequencer, using Redrum as a sound source, so you can ignore its built-in step-sequencer.

- Start with the kick. Place one kick on each quarter-note beat (steps 1, 5, 9, and 13).
- Add a rolling shaker. In this example, the shaker plays on every 16th note. Vary the velocities so some hits act as accents and others sit underneath.
- Build an interlocking percussion pattern. Choose a short percussion sound and place hits on steps 1,4,7,10, and 13. These three-step intervals move around the kick: some hits will line up with it, while others fall before or after. In my example, this phrase plays in bars 1 and 3, leaving empty space in the alternate bars to let the groove breathe.
- Add offbeat hats and rides. Place a hi-hat on the offbeat 8th notes (steps 3, 7, 11, and 15), which fall exactly halfway between each kick. I’ve layered a ride over these hits for a fuller top end. Adjust the volumes so the shaker and other percussion still cut through the mix clearly.
- Add a pickup clap. Place a clap on step 16, just before the bar’s kick. This gives each bar a small push into the next.
- Add extra accents. Use occasional tom hits (steps 2, 4, and 7). In this example, I also used the “FX Jeep Keys” sample for breath-like rhythmic accents (steps 3, 4, 6, 11, and 12)
Here’s what mine sounded like:
Step 2: Add swing using the ReGroove Mixer
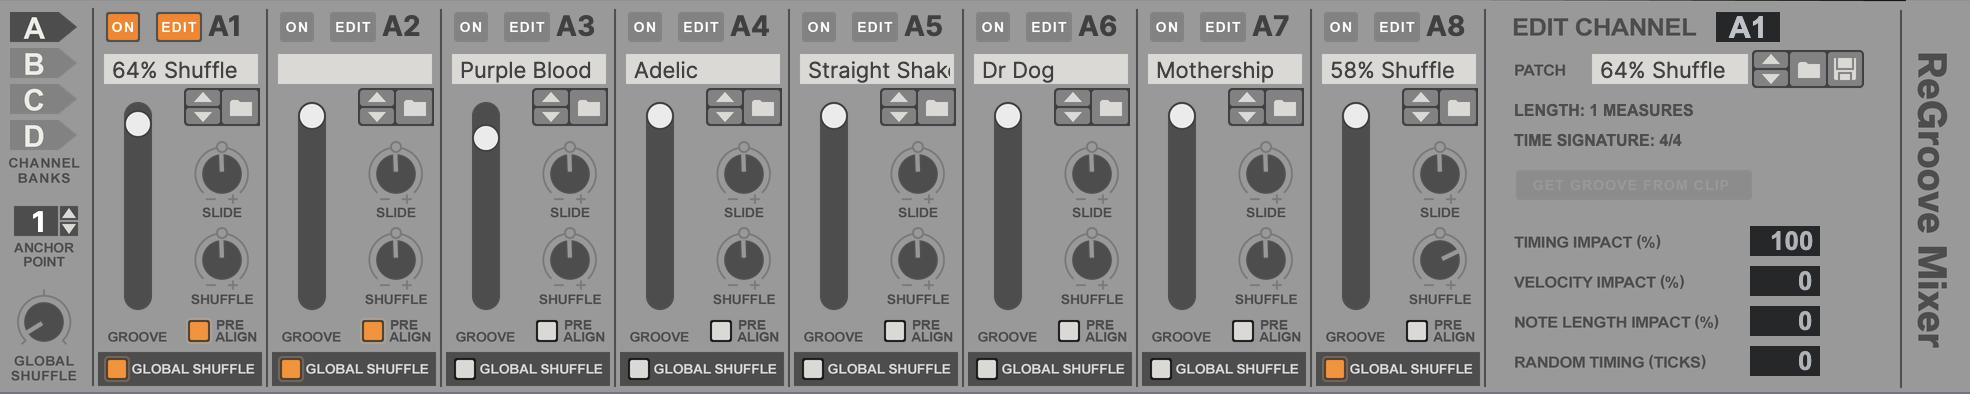
For our groove techno track, swing will introduce subtle, off-grid timing variations that can make a rigid electronic beat feel more alive. Since the genre relies on minimal melodies, this rolling groove becomes the main musical hook.
- Extract Notes to Lanes: Right-click your main MIDI drum clip on the Redrum sequencer track and select Extract Notes to Lanes.
- Explode the kit: When the Note Extract menu appears, look for the bottom option labeled Explode (all notes to separate lanes) and click the Move button. Reason will instantly move your kick, shaker, clap, and hats onto their own independent rows.
- Set up the ReGroove Mixer: Click the G button on the bottom right of the main transport bar to open the ReGroove mixer. On the A1 channel, turn the Global Swing knob to somewhere between 55-64%.
- Apply swing to the groove elements: In the main sequencer view, locate the Groove dropdown menu on the note lanes containing your shaker, percussion, hats, and clap. Set them all to A1.
- Keep the kick straight: Locate the note lane containing just your kick drum. Ensure its Groove dropdown remains set to None. This will keep the kick as a steady anchor for your beat.
Here are the drums again, but this time notice how they really start to groove:
Step 3: Create an evolving polymeter with uneven loop lengths
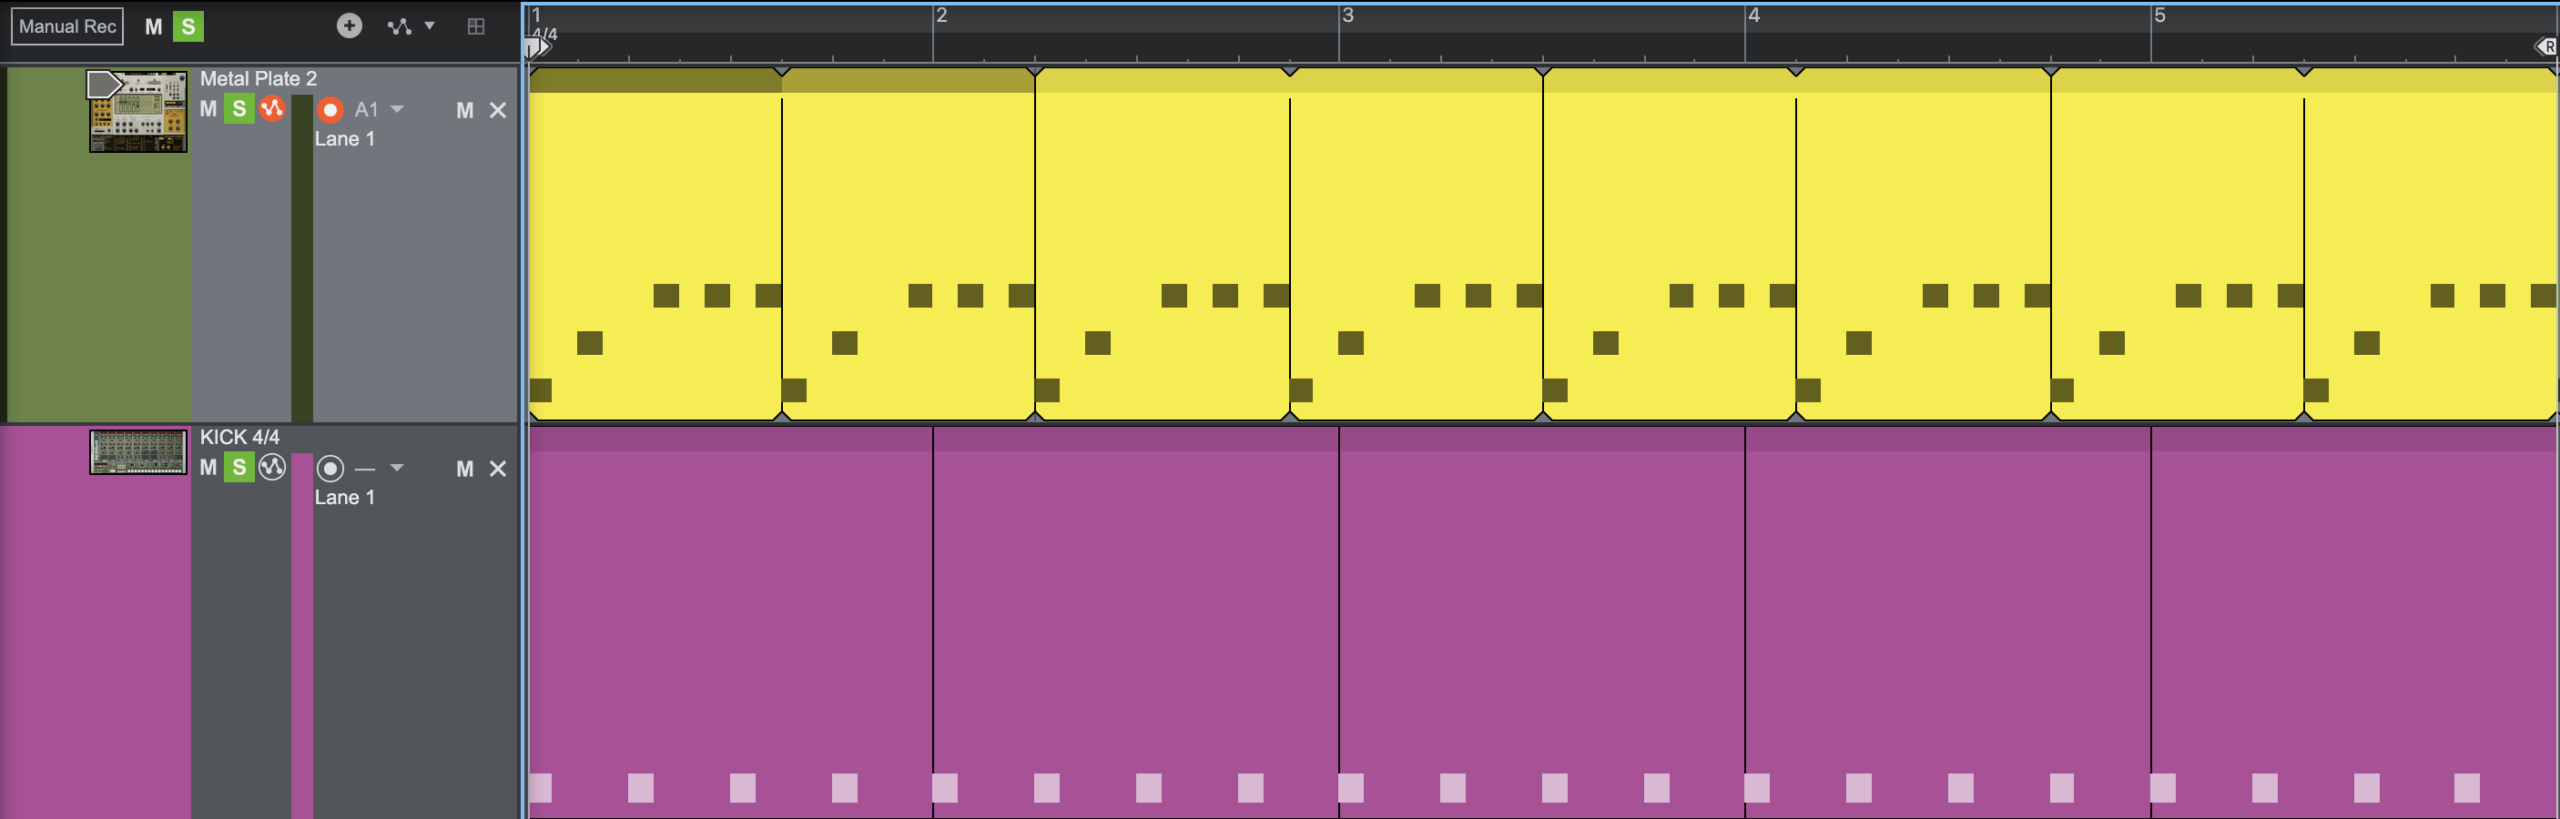
A polymeter occurs when two contrasting rhythmic loop lengths play at the same time. In standard 4/4 techno, drum loops are almost always four beats long. By creating a percussive pattern that is exactly five beats long, your loop will shift its starting position by one beat every time it repeats. It will not resolve to the original downbeat until five full bars have passed. This creates a constantly phasing, overlapping groove that evolves over the beat in a fun and unpredictable way.
- Load a percussive Patch: Create an instance of the Objekt modeling Synthesizer and load the “Metal Plate 2” preset. Physical modeling is perfect for this because it sounds organic and metallic.
- Tighten the release: Lower the release time on the Objekt’s envelope. You want this sound to be short and snappy. If the initial hit rings out for too long, the rhythm will blur together and create mud instead of groove.
- Program a 5-beat pattern: Instead of a standard 4-beat block, draw a MIDI clip that is exactly 5 beats long. Program a few sparse, syncopated hits within this clip.
- Loop it across the track: Because it does not fit evenly into a standard 4/4 bar, the pattern will automatically shift its starting position against the kick every time it repeats.
Here’s the metallic percussion against the kick. Listen to how the five-beat loop shifts against the steady 4/4 pulse:
- Add delay as a finishing touch: Add a Ripley Space Delay to your rack directly below Objekt. Set the delay time to 1/8T (eighth note triplets) to fill in the empty spaces of your pattern with a cascading tail, giving the polymeter a polished, metallic finish.
Step 4: Create a bassline with Monotone Bass Synthesizer

The key to a driving groove techno bassline is leaving enough space for the kick and percussion to perfectly lock in. The gaps are what actually create the groove. Keep your bass as a strong hypnotic motor.
For the main bass sound, I’m using the ‘Obscurer Bass’ preset in Monotone which is a classic donk-style bass that immediately punches right through the mix, but a basic sine or saw wave works just as well.
To give it grit and control, I’ve routed it through the MClass Maximizer, pushing the input gain into the Soft Clip circuit for warm harmonic saturation. Consider using a highpass filter at around 50Hz–65Hz to clean up unnecessary sub-rumble, leaving the absolute lowest sub frequencies to come directly from your punchy, mono kick drum.
Keep the note choice minimal. Here’s an example of a simple motif using just 2 notes:

I’ve built the bass around the root note F and the third scale degree of the minor scale. This gives me a dark sounding line with not too much melody, perfect for this type of track.
To add variation, try swapping the first hit of your bassline with a different bass sound. This creates a simple call-and-response. The new tone opens the phrase, and the original bass answers it. This will keep the rhythmic and melodic pattern familiar but add something fresh for listeners.
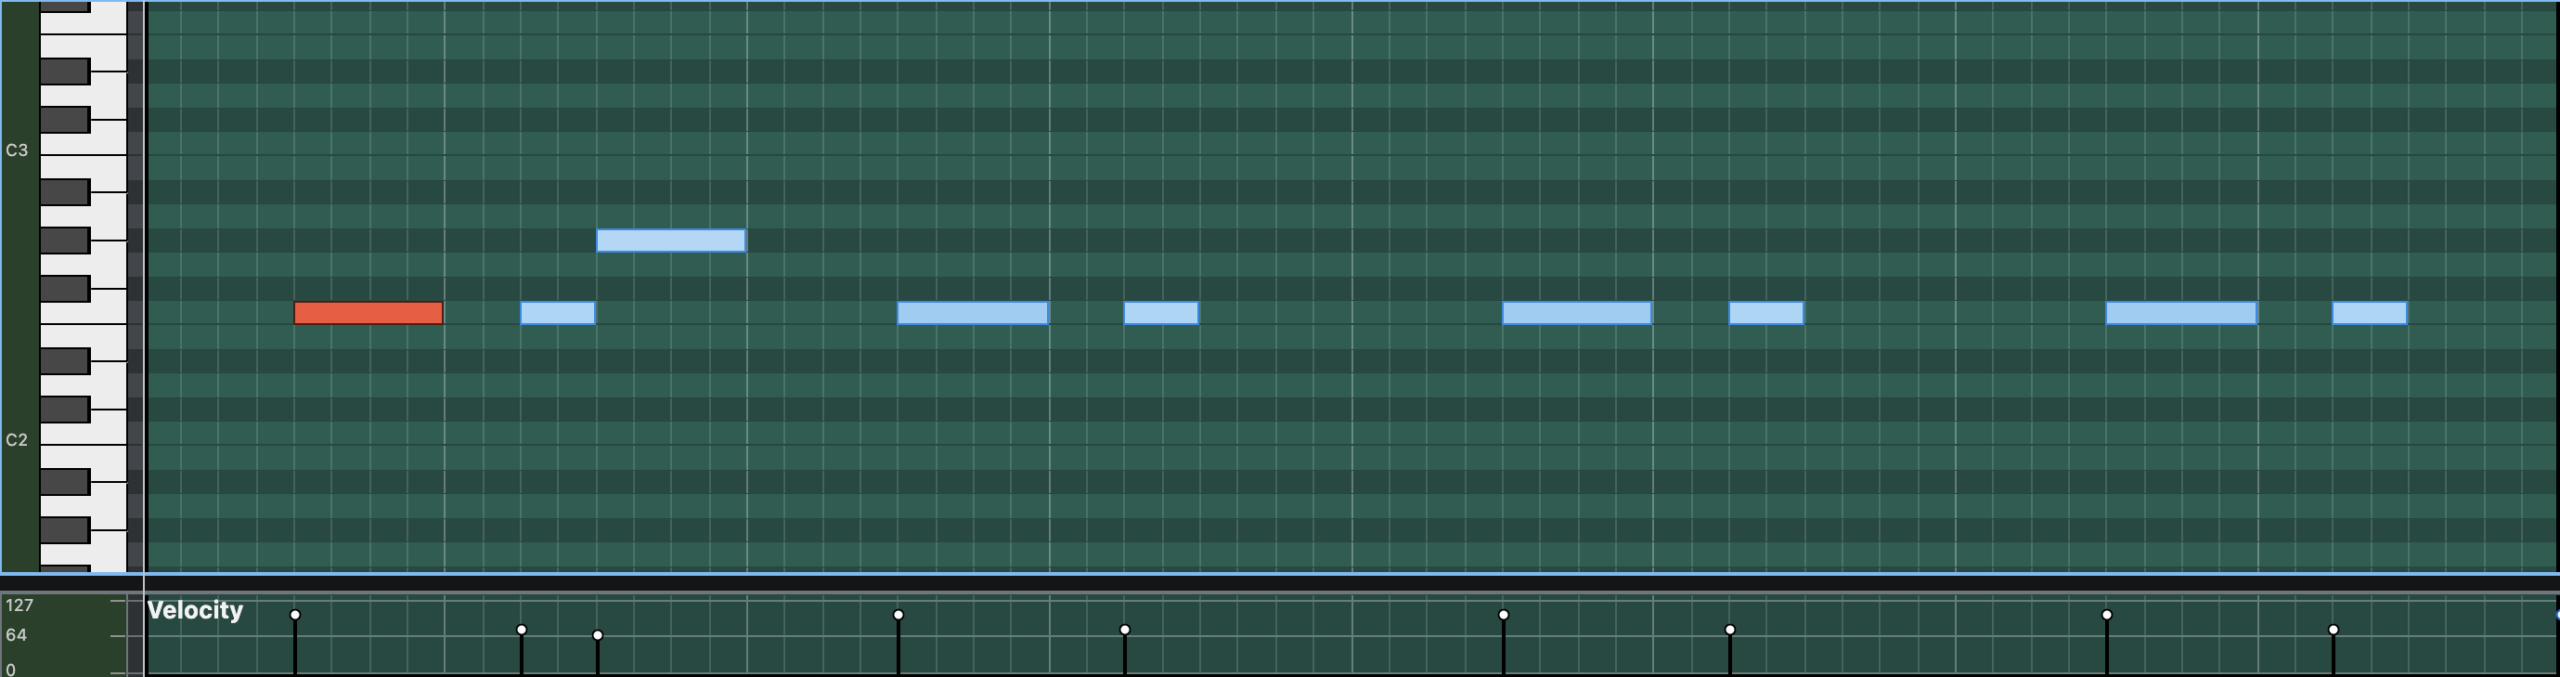
- Duplicate the bass instrument and its MIDI clip. Choose a contrasting preset for the duplicate. I’m using “Filter Square”.
- Keep only the first note in the duplicate’s MIDI clip. Leaving its timing and pitch unchanged.
- Remove that same note from the original bass clip. The new sound plays the opening hit, while the original bass plays the rest of the phrase.
- Balance their levels. Listen with the drums and adjust so they feel like they are parts of one bassline.
Here’s an example of how it sounds:
Step 5: Sidechain the bass to the kick

For groove techno, sidechain compression is a crucial technique where the kick drum automatically triggers a momentary duck in the volume of the bass. This helps to prevent muddy low-frequency clashes and creates the genre’s signature driving, “pumping” groove.
- Right-click in your rack and create a Spider Audio Merger & Splitter below your Redrum.
- Press TAB to flip the rack around.
- Drag a cable from the Channel 1 Audio Output on the back of your Redrum into the L/Mono input on the Spider’s Splitter section.
- Drag a cable from the first output on the Spider Splitter into the main Audio Input for your Drums mixer channel so the kick remains audible.
- Drag a cable from the second output on the Spider Splitter directly into the Dynamics Sidechain In on the back of your Monotone Mix Channel.
- Press F5 to open the Mixer.
- On the Monotone channel strip, turn the Compressor ON and hit the KEY button.
- Lower the Threshold and raise the Ratio until the bass signal ducks out of the way of the kick.
Here’s what it sounds like with the kick and bass together:
Step 6: Add movement with pads and atmospheres using Synchronous
Synchronous is the perfect tool to create continuous tension in groove techno, as static loops drain the track’s energy fast. This will help your atmospheres constantly evolve over time. While techno can be repetitive, it is the subtle variations people react to on the dancefloor that keep a track feeling fresh.
- Load a Europa pad: Add a Europa synthesizer and select a pad preset. In this example, I used the “WavePad9000” patch to build an atmospheric foundation.
- Create dissonant tension: Draw in two notes that are very close together in your MIDI clip (in this example, G and Ab). Playing them simultaneously creates a dissonant interval, which works perfectly for building tension right before a drop.
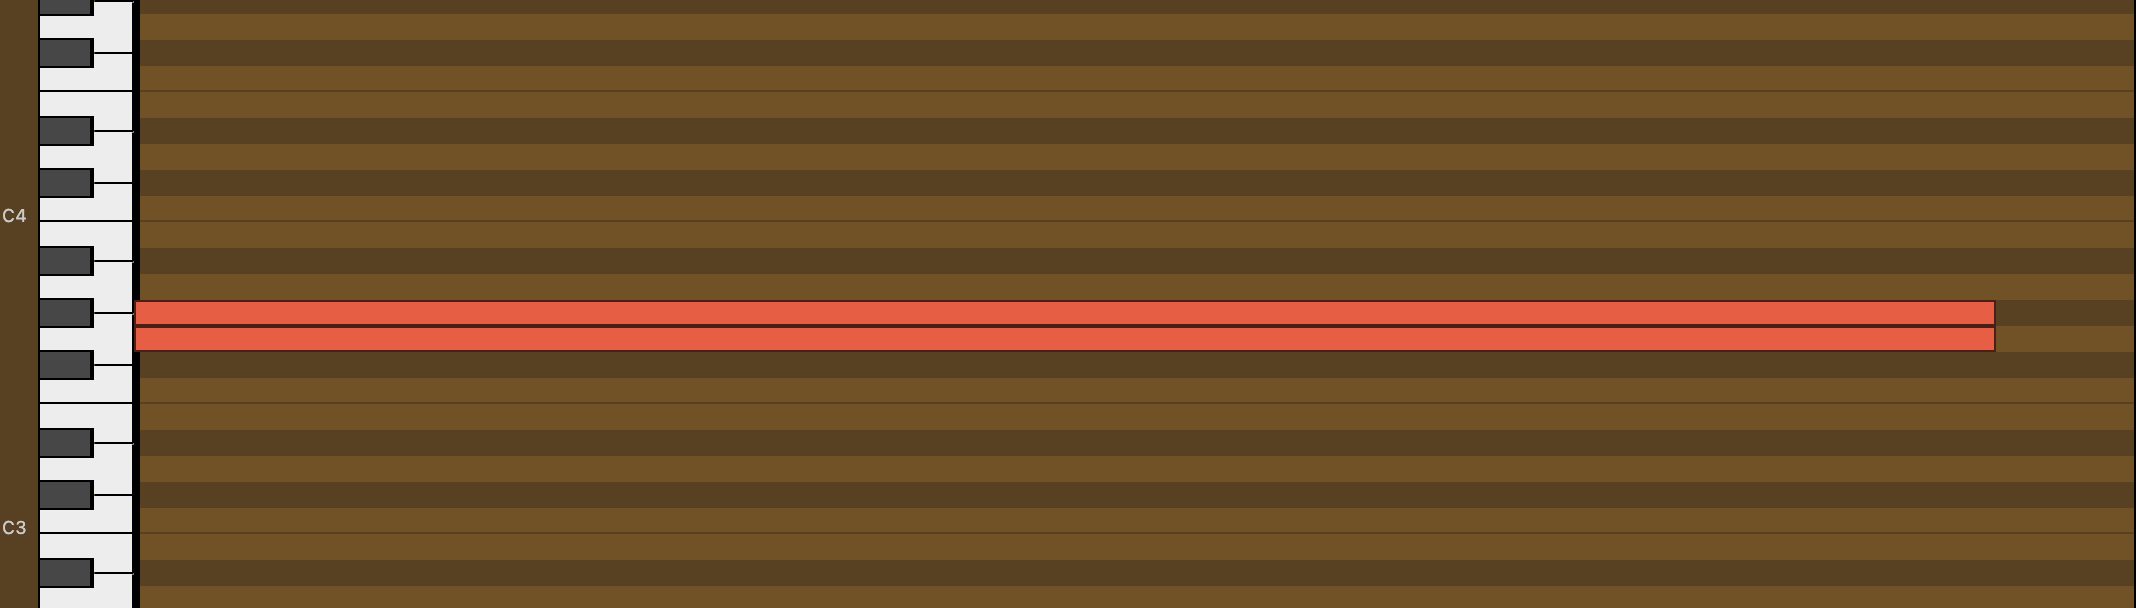
Here’s the dissonant pad without modulation:
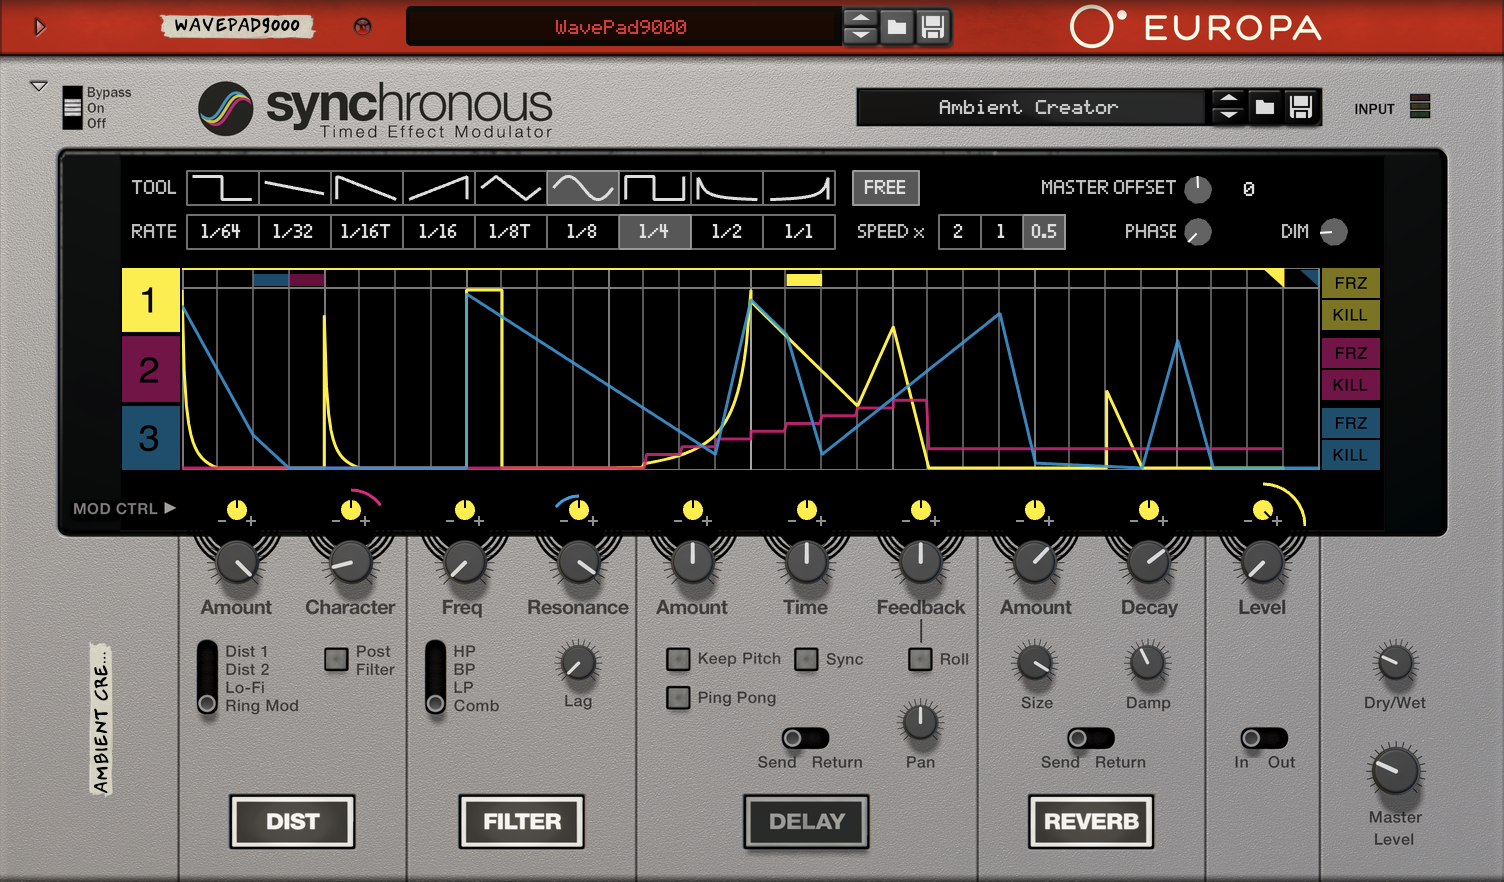
- Route through Synchronous: Add a Synchronous effect unit to your Europa channel. Select the Ambient Creator preset as a starting point. By automating the filters, delays, and volume inside the device, you can create hypnotic, rolling tension without having to write complex MIDI automation by hand.
- Engage Free Mode: Set the Synchronous timing to FREE MODE and adjust it to play 1/4th notes. Because this mode is not strictly locked to the project’s BPM grid, the effect will continuously modulate the dissonant pad in a unique, shifting way for the entire track. This will make your modulation feel more unpredictable. In this example, I also reduced the speed to 0.5x and shortened the step length.
- Customize the modulation: Experiment with drawing a unique LFO pattern of your own and play with the DIST, FILTER, DELAY, and REVERB sections to personalize the movement even further. Remember, the Dry/Wet knob can be set low for a more subtle effect.
Here’s the same pad with Synchronus modulation:
Here’s the complete groove techno loop with all the elements from this tutorial:
Conclusion
While new micro subgenres can rightfully feel like hairsplitting to some, subgenres can give artists the ability to develop on their own terms, find their own sound and identities, or distinguish themselves from the past scenes. It can also give new fans of underground electronic music a helpful entry point. The techniques above should give you a starting point for exploration in your productions. Experiment with dissonant textures, swing, sidechain compression, and modulation to create your own take on groove techno.
Written by Tobias Rochman
Ready to optimize your workflow?